A little bit of tartan…finally!

Remember my post when I said the Mr didn’t want any print of the sort in the house? Well, it seems that if it is free, even he can’t complain. Thanks to a lovely grandparent, we are now the proud owners of a lovely, wool throw, printed with a great red and grey tartan. Great for curling up under after a day at work, especially given that our front room radiator refuses to warm up completely (we even had to learn to bleed the thing with no success in solving the problem!).

20131108_175833_resized

20131108_175951_resized

20131108_175959_resized

The fact that this is a sort of inheritance makes this piece even better and goes with my aim of styling the house up for as little money as possible – especially since we decided to move house three months before Christmas (not the smartest move financially!).

I am loving all things tartan in interiors at the moment, and it seems that the trend is set to stay around for a good few months yet, with a refreshing lighter tone style for Spring/Summer 2014.

I really like these items on sale now, but I have a feeling, a tartan throw might be as far as I can push this one…

How to make coasters

Imagine my grief when the Mr put a cup of tea onto the newly painted drawer tables and it left a perfectly formed ring on the surface. After finishing the new side tables for the living room, my next project was to make some coasters to stop exactly this happening. It seems my crafting was a little too late on this occasion, but I still made these lovely set of four coasters to make sure no more marks will find their way onto my beautiful upcycled pieces of furniture.

I’ve seen these made in various magazines, online and on the TV and with a few quick buys and numerous samples of wallpaper, I got to work on a quiet Saturday afternoon. If you would like to stop partners (or guests) marking your items, these are a great idea. I am rather proud of them, and they match the living room scheme perfectly.

You will need:

Cork coasters – I bought my square ones from Hobbycraft. You can get circular ones if you prefer, or you could try making some sturdier versions from small, old tiles.
PVA glue and some strong glue
Paint brush for the glue
Scissors
As many wallpaper samples as you like
A length of felt – to cover the bottoms once you’ve finished. This will give a nice neat look and ensure the base is smooth and soft against the furniture
A little bit of time

Get all your things together ready to start making

Get all your things together ready to start making

Cut a piece of your chosen wallpaper and leave around 2cm around each edge. Stick the cork coaster in the middle and press

Cut a piece of your chosen wallpaper and leave around 2cm around each edge. Stick the cork coaster in the middle and press

Start folding over each edge neatly, pulling tight to make sure the surface on the front of the coaster is smooth

Start folding over each edge neatly, pulling tight to make sure the surface on the front of the coaster is smooth

If the edges start to lift up (despite lots of holding tight) use a little bit of strong glue to keep it in place

If the edges start to lift up (despite lots of holding tight) use a little bit of strong glue to keep it in place

Cover all your cork templates in your chosen design and paint a layer or two of PVA glue over them. Leave to dry completely. This took 24 hours when I did it

Cover all your cork templates in your chosen design and paint a layer or two of PVA glue over them. Leave to dry completely. This took 24 hours when I did it

All dried, cut a square of felt to the size of each coaster and stick to the back. Leave to dry again

All dried, cut a square of felt to the size of each coaster and stick to the back. Leave to dry again

Stack up your lovely display of new, unique coasters and take pride in your project

Stack up your lovely display of new, unique coasters and take pride in your project

Enjoy a cuppa and bask in the happy thoughts that there will be no more marks on your furniture!

Enjoy a cuppa and bask in the happy thoughts that there will be no more marks on your furniture!

What do you think of these DIY coasters? Will you be trying this craft project out for yourself?

Photo Friday #2

They say a picture is worth a thousand words, so I thought, as a light-hearted new series, I would post a photo each week to gauge opinion, get ideas from some of the other lovely bloggers out there and to also show off some of the great things that I have seen in that week.

We may have had the mother of all storms hit the South coast earlier this week, but I want to share the beauty of the Autumn season through this lovely photo courtesy of the Royal Horticultural Society (RHS). There is nothing more beautiful than the colours of the trees in Autumn, just before they fall off and the full force of Winter hits. I love going on walks on bright Autumn days, picking blackberries and admiring the warm oranges, reds and browns of the trees.

What do you love about Autumn?

How beautiful! Image: RHS

How beautiful!
Image: RHS

Ladder shelf loving

I have always loved how a room full of well-stocked bookshelves looks. There is something really cosy about a living room or study filled to the brim with books about all sorts of topics – travel, cook books, crafts, novels and true-life stories – and that have been bought from all sorts of different places, near and far. A lot of my books have been given as gifts, and a lot of them are either cook books or those full of ideas on thrifty home updates. These people don’t know me at all, clearly…

I love the use of the space here - and look how comfy it looks! (Image: Pinterest)

I love the use of the space here – and look how comfy it looks! (Image: Pinterest)

Stylish and functional (Image: Pinterest)

Stylish and functional (Image: Pinterest)

As well as functional, book shelves have got to look good too. There are so many different styles now available – high shelves, low units, thick, thin, geometric, cube shaped and even pyramid styles that make a real design statement, but all I really wanted was a set of lovely ladders. I have seen many blogs and Pinterest posts about reclaimed materials being used to create this look – which all work really well, but my choice came in the form of some gorgeous second-hand Marks & Spencer ones that I bagged for £40 on eBay. Given that these still retail at £129 in store, I am rather pleased with myself. We got the beech-veneer ones, which go well in the living room, but they also come in white, which would be nice in the bathroom.

Once positioned, they have become a home for my favourite books (ones that I flick through often when looking for recipes, upcycling ideas and general inspiration), as well as a host of graphic design books that belong to the Mr. The smaller top shelves have been adorned with lots of candles, photos and a few random knick knacks, including a piece of rock the Mr brought back after a recent cycling trip to the Lake District.

20130924_165026_resized

20130924_165035_resized

20131006_142931_resized

20131027_172234_resized

20131027_172306_resized copy

Now, we still have a huge box of books in the spare room, which are yet to have a home. But seeing the ladders has inspired the Mr to build a larger set of his own for the dining room come office at the back of the house. I think I may be rubbing off on him after all…

Photo Friday: #1

They say a picture is worth a thousand words, so I thought, as a light-hearted new series, I would post a photo each week to gauge opinion, get ideas from some of the other lovely bloggers out there and to also show off some of the great things that I have seen in that week.

The first comes from the Mr’s Nan, who offered us this set of tables. I am still thinking about whether we should take them or not, as we are becoming a bit short on space. However, I think they would look great with a lick of paint in a lovely range of pastel colours, inspired by a country cottage. What do you think? To take or not to take – that is the question.

Should we take this set of tables? I think they would be great for an upcycling project

Should we take this set of tables? I think they would be great for an upcycling project

Drawer tables are a thing, right?

Now, I am quite fond of the saying: waste not, want not, so when faced with a couple of redundant drawers, I was eager to come up with a new use for them. Left over from my now made-over sideboard, these two drawers were in line to become wooden planters for the garden, hanging box/shelves things, or – quite brilliantly – side tables. It was actually the Mr who accidentally came up with this idea when we first moved into the house and had nowhere to put a cup of tea when relaxing on an evening, and he turned one of the drawers on its side and rested his hot cuppa on the top. Because the drawers are narrow, they fit perfectly either side of the sofa, something I think we would struggle to achieve with shop-bought side tables.

I quickly came round to the new table idea – so, one rainy Saturday afternoon turned into another upcycling/makeover project and voila, these little gems were born.

A few people have suggested this idea is a bit mad, but I for one am quite proud of this reuse, and they match the rest of the living room (bar the horrible red carpet) beautifully. Who’d want to waste them anyway?

Take two old drawers like this one

Take two old drawers like this one

20131012_161735

Paint grey – this is Warm Pewter matt emulsion by Dulux, which I used for the sideboard

20131013_152912

Mask off stripes and paint two coats of colour. I went for Banana matt emulsion by Habitat and gloss white by Johnstones Paints to bring contrast and to tie the colours to the sideboard further

20131013_154847

Once completely dry, carefully peel away masking tape to reveal the finished design

20131013_174241

This one fits snugly between the sofa and some shelves

20131013_174252

A great place for our side lamp (need a new lampshade – ideas please?!)

What do you think? Is this mad or savvy upcycling? The only thing I would change is to fill the holes left by the drawer pulls.

The 80’s Called…

I came across Been There, DIY’d That a little while ago and found some really great ideas for upcycling furniture. Now that my sideboard is done, I am longing for another project to get my teeth into so, watch this space, I may try this great table idea out. Give me a geometric print and an old piece of furniture and I am a happy lady.

Been There, DIY'D That

20130922-203828.jpg

And they want you to give their table another chance.
I know, it’s hard, it’s not my thing either. But it was two dollars at a garage sale and it was crying out for me to save it. Besides, the 80’s are making a comeback whether we like it or not. Clothes, hair, music and even creeping into home decor. I live in a college town and I see flash dance everywhere! That being said, a lot of college girls shop at our local antique mall where I share a little room/booth with my super crafty and super creative momma. So why not try my hand at reviving this sad little table. If I could change my mind about midcentury furniture then why not this?

20130922-193049.jpg I was inspired by a fellow blogger’s table. You really should check out her blog. She is a pretty neat chick. She did hers a…

View original post 178 more words

Upcycled sideboard

Inspired by good old Kirstie Allsopp, I have finally transformed my old sideboard (which I picked up for £15 at a local furniture clearance) into a practical media unit for the living room. I am loving grey and yellow as a colour scheme, so chose to do the sideboard the same. The Mr and I popped over the road to Homebase and picked up ‘Banana’ matt emulsion by Habitat and ‘Warm Pewter’ matt emulsion by Dulux. While the paint cost us more than the actual sideboard itself, the quality of the colours is worth every penny and I am looking forward to seeing what else I can paint to match our new piece.

To make room for our DVD player and Freeview box, I decided to take two of the drawers away (still trying to figure out another use for them) and painted the cavity in yellow. I continued the yellow on the inside of the drawers and left the rest grey. To pay homage to the original piece, I left the legs uncovered, as I really like the shape of them. After two coats and a few drying hours in between, I added some lovely ceramic drawer pulls from Pushka Knobs, which I discovered while working at The National Home Improvement Show last month.

What do you think of the finished result? All we need to do is drill a hole in the back for the cables and slide a shelf into the cavity to make room for more gadgets. I am really pleased at how this little project turned out – and it only took one weekend. Thanks Kirstie!

PhotoGrid_1381672170005PhotoGrid_1381672301566

Furniture Makeovers: Simple techniques for transforming furniture by Barb Blair

It’s Saturday afternoon and I am waiting for the first coat of paint to dry on my sideboard project, which I have finally got round to doing. Keep posted for a blog on it when it is finished. I thought I would take this time to tell you about a great book that I was given recently.

Furniture Makeovers: Simple techniques for transforming furniture by Barb Blair is a great book filled with ideas and inspiration on how to source, strip and bring a bit of life back into an old piece. For anyone, myself included, who wants to transform their home with one-off pieces that have been sourced on a budget and repurposed with care and attention, Barb Blair has some of the best ideas on how to achieve this, and how to do so with simple and easy-to-follow technique using paint, wallpaper, stains, stencils and anything else you could think of pasting onto old wood.

Furniture Makeovers: Simple techniques for transforming furniture with paint, stains, paper, stencils and more, by Barb Blair

Furniture Makeovers: Simple techniques for transforming furniture with paint, stains, paper, stencils and more, by Barb Blair

20130904_210447
With a foreword by Holly Becker, founder of  Decor8 blog (take a look if you haven’t already – it’s full of great ideas), I was excited to get stuck into this book and try out as many of the projects that I could and even use some of the techniques and put my own spin on them.

An experienced finder of unloved pieces to make new again, Barb tells you where to look for the best items, the types of wood that will last a makeover, the conditions to look out for, what tools and materials to use, how to strip and repair pieces before painting and also how use various finishes, from wax to matt emulsion and stencilling to decoupage.

Each project in the book is named, such as Artemis, Blanche, Jules and Lottie, which features on the front cover. My favourite, particularly since I an undergoing a sideboard project of my own, is called Amabel. I would love to know the shade of grey used, as I think it is just lovely, and would be perfect in the living room. She has left the legs in the original state and stencilled on bold orange arrows on the top to add something a little different.

My favourite - Amabel

My favourite – Amabel

Lee and Cabbot - a great use of decoupage

Lee and Cabbot – a great use of decoupage

Lee and Cabbot were to unloved ends of a desk, which were chopped off to become two chests. They were made over using decoupaged paper and some lovely wooden knobs – I love the result.

Finally, as  I wouldn’t want to give everything away, there’s Barb’s milk men. By using white matt spray paint to cover an assortment of glass vases and milk bottles, she has created a display fit for any modern home.

I'm going to see if I can collect some nice jars and bottles to make some milk men of my own

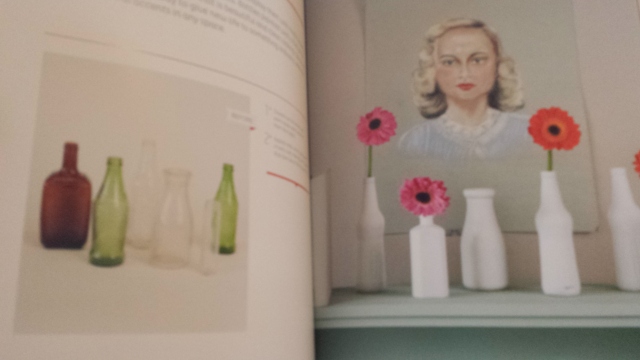
I’m going to see if I can collect some nice jars and bottles to make some milk men of my own

In her introduction, Barb says, ‘I hope that this book will inspire you to discover a creative passion, see potential in the world around you, roll up your sleeves, and create furniture masterpieces of your very own!’. Well, thanks to you Barb, I now have plenty of ideas on how to make my new home, truly my own. I’m off to make a cuppa and carry on with that second coat.

Organising art

I am a Virgo, so naturally a bit of an organiser, list-maker and neat freak. When it came to organising where to put the numerous photos and prints we have accumilated over the years in the new house, it was a task I was happy to take on. The idea for a wall of prints is one I found on Pinterest recently and having seen it done in numerous house case studies in the homes and interiors titles, I was eager to give it a go myself. I really like the sort of dysfunctional organised spirit of the whole thing and think the overall look is very effective, and one that you can look at with interest many, many times (as opposed to looking at the same single image over and over again).

Screen Shot 2013-10-08 at 13.51.39

I found plenty of inspiration for my picture hanging project on Pinterest

I found plenty of inspiration for my picture hanging project on Pinterest

For a timeless and modern feel, we went for only black and white frames. While I am not against the use of colour in the home, I think the monochrome scheme works well for the wall of artwork and you can get some really nice chunky, ornate, textured and simplistic frames to give a sense of variety.

To start, I gathered all of the framed prints we wanted to put up in the hallway and organised them on the floor. It was easy to see which picture worked well alongside others this way and meant that I could play around with the layout before hanging them on the wall. Once I decided on the best selection and location for each, I took a picture for reference. This is my top tip for this project as once you start hanging them it is good to look back at the photo you took to remember the layout you liked.

My top tip is to lay out the frames on the floor before you start and take a picture of the layout to reference when hanging them

My top tip is to lay out the frames on the floor before you start and take a picture of the layout to reference when hanging

Conscious of not putting too many holes in our rented property’s walls, I used these nifty adhesive strips from Command which act like Velcro to secure your frames to the wall. All you do is bind the strips together, stick to the frame and them attach the other sticky side to the wall (note: it is handy to have someone else around when doing this to ensure you stick them on straight!).

These Command strips are a great idea to prevent putting holes in the wall

These Command strips are a great idea to prevent putting holes in the wall

There's plenty of room to add more prints when we collect them...

There’s plenty of room to add more prints when we collect them…

By arranging the different shaped frames in varying heights, we added interest and individuality

By arranging the different shaped frames in varying heights, we added interest and individuality

I even included this little fella... I think it is good to add some one-off pieces that hold sentimental value

I even included this little fella… I think it is good to add some one-off pieces that hold sentimental value

Once all of the frames were up, the display covered around half the length of the hallway, leaving plenty of room so that we can build our collection and keep adding to it when we find other prints that we like. I even included a little penguin sketch that the Mr did for me a few years ago as a joke, but I love penguins and it holds some strange sentimental value (although he thought I was being weird by putting it up!).

I love the new look of the hallway now, and as soon as the first picture went up, it instantly made the house feel more homely. I can’t wait to add more as time goes on, it’s like our own little piece of artwork, filled with our favourite things, and looks lovely and neat.

What do you make of the art display? Do you struggle to find space for all your pictures? I’d love to see new ideas for displaying your favourite pieces.